In this article you'll get an introduction to working with shading languages. I'll cover the basics of using the low level shading language, called AGAL (Adobe Graphics Assembly Language) that is included with the Stage3D API. You'll learn what AGAL is, how it works, and how to use it as part of your Stage3D-based OpenFL application.
Understanding Shading languages
Before diving into AGAL specifically, it's a good idea to first understand what a shading language is and how you can use it to create shaders.
Shaders are not written in Haxe. They are not written in C++ either. Nor any other general purpose language.
Shaders are usually written in a special language, called a shading language.
Shaders are programs that run on the GPU, so the most efficient way to code a shader is to use a language that is specifically engineered with the GPU in mind. That's why you'll write shaders using these special shading languages, instead of using general purpose languages designed to code for a CPU.
There are several shading languages that have been used over the years, for the two standard native 3D platforms (OpenGL and DirectX): GLSL and HLSL are two of the most common shading languages.
The Stage3D API provides AGAL as a shading languages to create programs for the GPU.
Overview of AGAL
AGAL (Adobe Graphics Assembly Language) is an assembly language for GPU programming. It's a very low level language, that is extremely close to what the GPU actually executes. A GPU (and also a CPU for that matter) doesn't directly understand a high level kind of language like Haxe, which contains variables, classes, and so on. GPUs only understand elementary machine language commands. There is a compiler somewhere in the pipeline that translates the complex commands of the high level language, into a series of simpler, lower level machine language commands.
With AGAL, you write commands directly at the lower level, similar to the commands that the GPU understands. As a result, you get a better understanding of what's really happening in your rendering pipeline. You can hand optimize your shader instead of letting a compiler do that for you. So, as you invest more time to learn AGAL, you may be able to create better optimized shaders.
When you use AGAL, your shaders come in the form of shader program strings, that are assembled into object code at run time. So, it is possible to create AGAL shaders dynamically at runtime.
Examining the syntax of AGAL
AGAL is an assembly language. If you are used to the code syntax in Haxe, a language like AGAL that is an assembly might look a bit alien at first.
Here's an example of an AGAL Vertex Shader:
m44 op, va0, vc0
mov v0, va1
I'll describe the syntax of the example above, so that you can decipher what each of those assembly lines means.
Every line of the shader is a command, specified by a 3 character string called opcode.
The syntax of an AGAL code line is comprised of the following:
<opcode> <destination>, <source 1>, <source 2 or sampler>
This is the key. Keep this syntax in mind and AGAL will suddenly stop looking like unreadable gibberish.
Following the opcode, depending on the command, there may also be a destination, and one or two sources. The destination and the sources are called registers: small memory areas in the GPU for use by shaders. I'll cover registers in more detail later in this tutorial. The sources contain the values used in the operation, and the destination is where the result is stored.
Identifying the main opcodes in AGAL
AGAL features approximately 40 different opcodes. Here are some of the most common ones.
mov:moves data from source1 to destination, component-wiseadd:destination = source1 + source2, component-wisesub:destination = source1 – source2, component-wisemul:destination = source1 * source2, component-wisediv:destination = source1 / source2, component-wisedp3:dot product (3 components) between source1 and source2dp4:dot product (4 components) between source1 and source2m44:multiplication between 4 components vector in source1 and 4×4 matrix in source2tex:texture sample. Load from texture at source2 at coordinates source1.
Figure 1 and Figure 2 provide an overview of the AGAL command set.
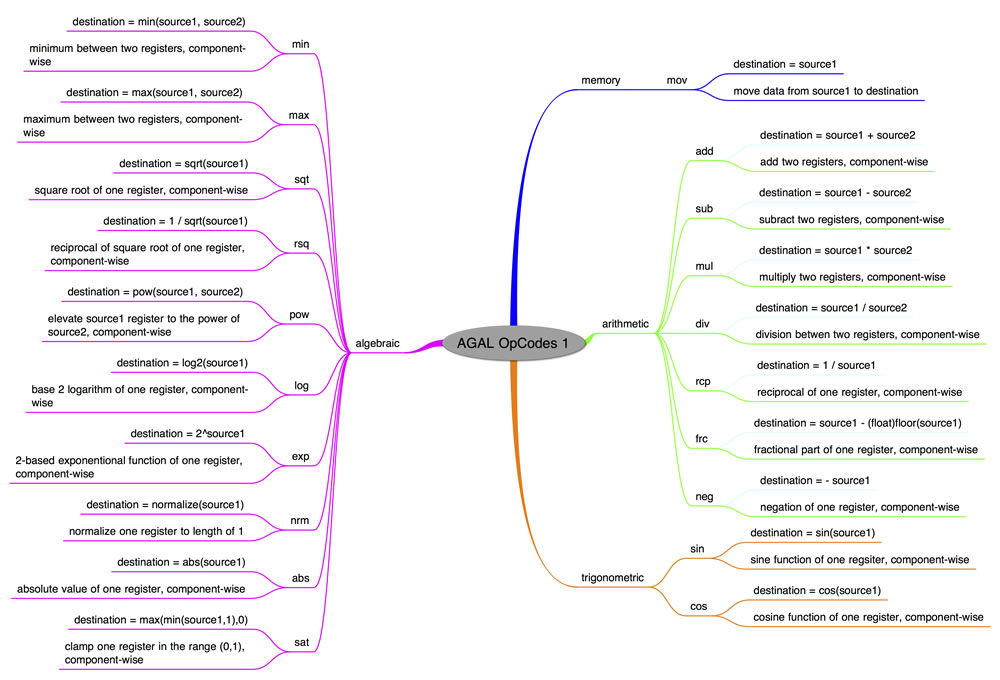
Figure 1. AGAL Memory, Arithmetic, Trigonometric and Algebraic related opcodes.
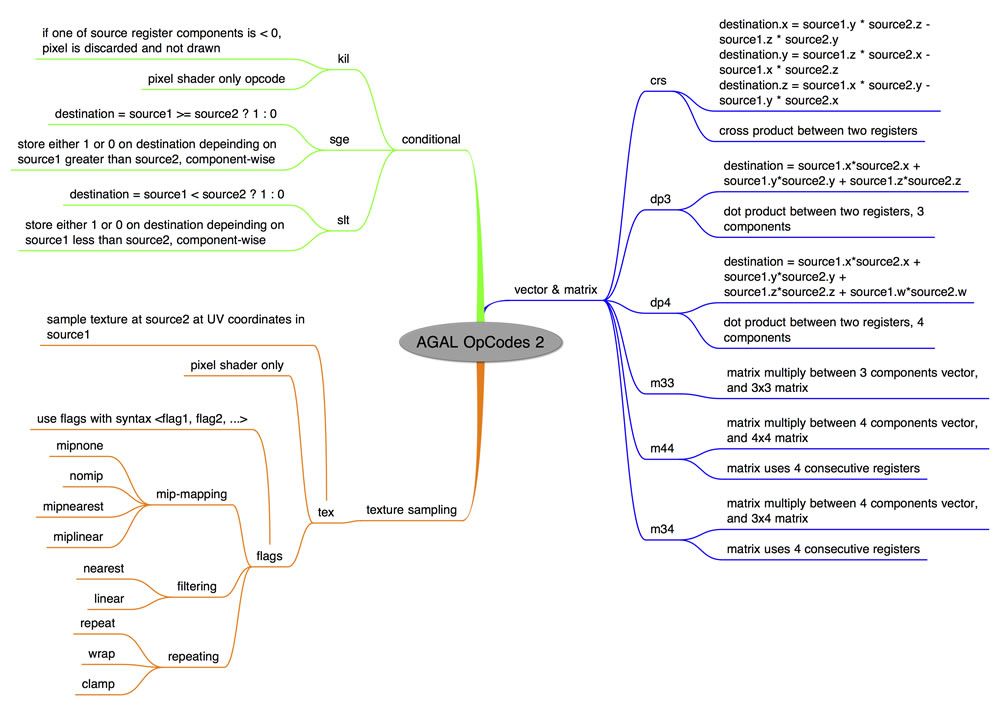
Figure 2. AGAL Vector and Matrix, Conditional, and Texture Sampling Related opcodes.
Working with AGAL registers
AGAL doesn't use variables to store data, like Haxe and other high level languages do. AGAL just uses registers.
Registers are small memory areas in the GPU that AGAL programs (shaders) can use during their execution. Registers are used to store both the sources and the destination of AGAL commands.
You can also pass parameters to your shaders through these registers.
Each register is 128 bits wide, which means that it contains 4 floating point values. Each of these values is called a component of the register.
Register components can be accessed both through the coordinate accessors (xyzw), and through the color accessors (rgba).
The first component of a register, can be accessed like this:
<register name>.x
As well as with this code:
<register name>.r
Sometimes registers contain coordinate-like data, while other times they contain color data. By using the right kind of accessors, you can make your code clearer and easier to read.
Some of the opcodes above, like add, perform their operations component wise. This means that the addition operation is performed component by component, so that the x component is added to the x component, the y component is added to the y component, and so on.
There are six types of registers available.
1. Attribute registers
These registers reference the Vertex Attribute data of the VertexBuffer that is the input of the Vertex Shader. Therefore, they are only available in Vertex Shaders.
This is the main data stream that the Vertex Shader is responsible for processing. Each vertex attribute in the VertexBuffer has its own attribute register.
In order to assign a VertexBuffer attribute to a specific attribute register, use the function setVertexBufferAt() on a Context3D instance, with the proper index.
Then from the shader, access the attribute register with the syntax: va<n>, where <n> is the index number of the attribute register.
There are a total of eight attribute registers available to Vertex Shaders.
2. Constant registers
These registers serve the purpose of passing parameters from Haxe to the shaders. This is performed with the setProgramConstants() family of functions on the Context3D class.
These registers are accessed from the shader with the syntax: vc<n> for Vertex Shaders and fc<n> for Fragment Shaders, where <n> is the index number of the constant register.
There are 128 constant registers available to Vertex Shaders, and 28 constant registers for Fragment Shaders.
3. Temporary registers
These registers are available to shaders, and they are used for temporary calculations. Since AGAL doesn't use variables, you'll use temporary registers to store data throughout your code.
Temporary registers are accessed with the syntax vt<n> (Vertex Shaders) and ft<n> (Fragment Shaders) where <n> is the register number.
There are 8 temporary registers available for Vertex Shaders, and 8 for Fragment Shaders.
4. Output registers
The output registers are used by Vertex and Fragment Shaders to store the output of their calculations. For Vertex Shaders, this output is the position of the vertex. For Fragment Shaders it is the color of the pixel.
These registers are accessed with the syntax op for Vertex Shaders, and oc for Fragment Shaders.
There is obviously only one output register for Vertex and for Fragment Shaders.
5. Varying Registers
These registers are used to pass data from Vertex Shaders to Fragment Shaders. The data that is passed is properly interpolated by the GPU, so that the Fragment Shader receives the correct value for the pixel that is being processed.
Typical data that gets passed in this way is the vertex color or the UV coordinates for texturing.
These registers can be accessed with the syntax v<n>, where <n> is the register number.
There are 8 varying registers available.
6. Texture sampler registers
Texture Sampler registers are used to pick color values from textures, based on UV coordinates.
The texture to be used is specified through Haxe with the call setTextureAt() on a Context3D instance.
The syntax for using texture samplers is: fs<n> <flags>, where <n> is the sampler index, and <flags> is a set of one or more flags that specifies how the sampling should be made.
<flags> is a comma separated set of strings, that defines:
- texture dimension. Options:
2d,cube - mip mapping. Options:
nomip(ormipnone, they are the same),mipnearest,miplinear - texture filtering. Options:
nearest,linear - texture repeat. Options:
repeat,wrap,clamp
For example, a standard 2D texture without MIP mapping and linear filtering could be sampled into temporary register ft1, with the following line:
tex ft1, v0, fs0 <2d,linear,nomip>
In the example above, the varying register v0 holds the interpolated texture UVs.
Creating a sample AGAL shader
In this section, you'll go through a shader example and get a better understanding of how it operates.
Suppose the vertices in the Vertex Buffer contain vertex position, at offset 0, and vertex color, at offset 3. The code looks like this:
var vertices:Vector<Float> = Vector.ofValues(
    -0.3,-0.3, 0.0, 1.0, 0.0, 0.0, // x, y, z, r, g, b
    -0.3, 0.3, 0.0, 0.0, 1.0, 0.0,
     0.3, 0.3, 0.0, 0.0, 0.0, 1.0);
The goal is to make the Vertex Shader properly transform the vertex positions, and to pass on each vertex color to the Fragment Shader.
You can achieve this with the following code:
m44 op, va0, vc0 // pos to clipspace
mov v0, va1 // copy color
The first line performs a 4×4 matrix multiplication between the vertex input attribute register 0, va0, and a transformation matrix that is being passed in from Haxe. When rendering in perspective, this is usually the transformation matrix from model space to clip space that we assume was passed from Haxe to the constant register 0, vc0.
Note: Clip space and perspective projection is discussed in more detail in the next tutorial in this series, titled Working with Stage3D and perspective projection.
The matrix can be passed to the shader, into register vc0 with the call:
context3D.setProgramConstantsFromMatrix(Context3DProgramType.VERTEX, 0, matrix, true);
The second line of the Vertex Shader, copies the vertex color data to Varying Register 0, v0, so that it can get interpolated by the GPU, and passed to the Fragment Shader.
The Fragment Shader simply copies the Varying Register v0 color content to its Output Register oc:
mov oc, v0
So, this Vertex/Fragment Shader pair just transforms the 3D model vertices using a transform matrix that gets passed in from Haxe, and applies vertex color.
This is it! Your first Vertex and Fragment Shaders.
Building a sample OpenFL app with Program3D and AGAL Mini Assembler
So, how do you actually fit those bits of AGAL code into a working OpenFL application? This is where the Stage3D API comes in.
var program:Program3D = context3D.createProgram();
Before being able to use a Program3D (a shader) for rendering, you first need to upload it to the GPU. You do that by calling the upload method on the Program3D class.
public function upload(vertexByteCode:ByteArray, fragmentByteCode:ByteArray):Void;
This method call needs as input the compiled, object code, version of the Vertex and Fragment Shaders in order to upload it to the GPU.
A good way to compile AGAL shaders into object code is to use the openfl.utils.AGALMiniAssember class: a utility tool that takes as input the Vertex and Fragment Shaders source code as strings, and compiles them at runtime into object code.
So, first you are going to use AGAL Mini Assembler to compile the Vertex and Fragment Shaders discussed above.
var vertexShaderAssembler:AGALMiniAssembler = new AGALMiniAssembler();
vertexShaderAssembler.assemble(Context3DProgramType.VERTEX,
    "m44 op, va0, vc0\n" + // pos to clipspace
    "mov v0, va1" // copy color
);
var fragmentShaderAssembler:AGALMiniAssembler= new AGALMiniAssembler();
fragmentShaderAssembler.assemble(Context3DProgramType.FRAGMENT,
    "mov oc, v0"
);
And then upload both Vertex and Fragment Shader programs to the GPU:
var program:Program3D = context3D.createProgram();
program.upload(vertexShaderAssembler.agalcode, fragmentShaderAssembler.agalcode);
Communicating to AGAL with Haxe
A shader doesn't live just by itself. It is used by your main Stage3D based OpenFL application. Therefore it needs the application to send to it the data that needs to processed.
In general, shaders will need VertexBuffer data (Vertex Attributes), Textures, and additional parameters that the shader may need from Haxe, such as a transform matrix.
At render time, before using a Program3D, and related VertexBuffers and Textures, you'll need to enable them, by using the following calls:
Contex3D::setProgram(program:Program3D)Context3D::setVertexBufferAt(index:Int, buffer:VertexBuffer3D, bufferOffset:Int, format:String)Context3D::setTextureAt(sampler:Int, texture:TextureBase)
Note that setVertexBufferAt enables a specific Vertex Attribute at a certain offset in the Vertex Buffer (parameter 3), and associates it to an Attribute Register (stream) specified by index (first parameter).
The setTextureAt call enables a Texture and associates it with a certain Texture Sampler specified by the first parameter sampler.
This would be the syntax to use these calls, right before rendering:
// vertex position to attribute register 0
context3D.setVertexBufferAt(0, vertexBuffer, 0, Context3DVertexBufferFormat.FLOAT_3);
// assign texture to texture sampler 0
context3D.setTextureAt(0, texture);
// assign shader program
context3D.setProgram(program);
Before enabling any of these you need to make sure that they are uploaded to the GPU, by calling the respective upload methods:
Program3D::upload()VertexBuffer3D::uploadFromVector(data:Vector<Float>, startVertex:Int, numVertices:Int)Texture::uploadFromBitmapData(source:BitmapData, miplevel:UInt = 0)
Then you'll want to be able to pass in parameters to your shaders as constants, stored into Constant Registers. You do that with the following calls:
Context3D::setProgramConstantsFromVector(programType:String, firstRegister:Int, data:Vector<Float>, numRegisters:Int = -1)Context3D::setProgramConstantsFromMatrix(programType:String, firstRegister:Int, matrix:Matrix3D, transposedMatrix:Bool = false)
in order to write an OpenFL Vector or a Matrix3D respectively.
So, if you need to pass in a basic rotation matrix to your shader you'll do something like this:
var m:Matrix3D = new Matrix3D();
m.appendRotation(Lib.getTimer() / 50.0, Vector3D.Z_AXIS);
context3D.setProgramConstantsFromMatrix(Context3DProgramType.VERTEX, 0, m, true);
The matrix gets stored into Constant Register 0 here, for the Vertex Shader to use.
Where to go from here
This article introduced you to the concept of shaders and to the AGAL shading language. Creating a shader is a required step if you want to build an OpenFL 3D application that is based on the Stage3D API. While we didn't get to build a fully working Stage3D application yet, the content of this article is a fundamental block in being able to use the Stage3D API. In the next article of this series I am going to put everything together, and show you how to build an application that uses Stage3D to render a simple geometry.