In this article you'll examine a working OpenFL application based on the Stage3D API. First you'll to learn how to properly configure a Stage3D-ready build environment. Once the sample project is set up, you'll see how to initialize Stage3D from Haxe, and how to create and render a super simple 3D scene consisting of a single colored triangle using Stage3D.
Finally, you'll take a look at the process of applying texture mapping and you'll review a Stage3D application with a texture mapped geometry.
Setting up the build environment
When you get started building Stage3D apps, the first task involves preparing your build environment and ensuring it is properly setup.
While it's certainly possible to build Stage3D applications using the barebones Haxe compiler from the command line, it is often more convenient to use an integrated tool such as Visual Studio Code or IntelliJ IDEA. The steps provided in this article focus on working with Visual Studio Code.
If you haven't already, install Haxe and OpenFL. Begin by downloading and installing the latest version of Haxe from the official website, or from your favorite package manager.
Next, open a terminal and run the following commands to install OpenFL from Haxelib:
haxelib install openfl
haxelib run openfl setup
Now that you've set up the Haxe and OpenFL, you are ready to create a new OpenFL project in Visual Studio Code.
If you've haven't yet installed the Lime extension for VSCode, it's pretty simple.
In Visual Studio Code, select View > Extensions.
Search for the Lime extension by OpenFL.
Click the Install button.
With your development environment all set up, it's time to create a new project.
You will create an empty folder and run a command to create a project in that folder.
In Visual Studio Code, select File > Open Folder…
Create an empty folder for your project somewhere on your computer. Call it HelloTriangle.
Select the empty HelloTriangle folder and click Open.
Select View > Command Palette….
Search for and execute the OpenFL: Create New Project command.
When prompted to select a folder where the project should be created, select the empty HelloTriangle folder.
To make sure that everything compiles and runs properly, run Lime's test command.
Select Run > Start Debugging.
From the list of available debuggers, select Lime.
A launch.json file will open with the following launch configuration:
{
    "name": "Lime",
    "type": "lime",
    "request": "launch"
}
Select Run > Start Debugging again.
The project will build, and your web browser will launch a blank window.
Alternatively, you may compile and run the project from a terminal. Open a terminal, navigate to the HelloTriangle folder, and run the following command:
lime test html5 -debug
Next, we'll add some Haxe code to actually display something in the browser using Stage3D.
Initializing Stage3D
Now that you've set up the OpenFL app, the first thing you'll do is initialize Stage3D.
In order to perform 3D rendering, you'll need an instance of the Context3D class, which is basically going to serve as a 3D rendering surface.
So, in the constructor, add the following code:
public function new()
{
    super();
    stage.stage3Ds[0].addEventListener(Event.CONTEXT3D_CREATE, initStage3D);
    stage.stage3Ds[0].requestContext3D();
}
The code above simply requests a Context3D instance using the Stage3D API, and registers an event listener. When the Context3D instance is ready, the initStage3D function is called back by the event.
As soon as initStage3D is called, it's important to properly configure your Context3D instance by calling the configureBackBuffer method:
private function initStage3D(e:Event):Void
{
    context3D = stage.stage3Ds[0].context3D;
    context3D.configureBackBuffer(800, 600, 2, true);
    ...
}
The code above specifies that you are using an 800 x 600 pixel rendering viewport, with a minimal level of anti-aliasing (the third parameter), and creating depth and stencil buffers for this rendering surface (the fourth parameter).
Creating a colored triangle geometry
In this section you'll create some 3D geometry (the 3D object to be rendered). For this sample, you'll create the simplest geometry possible: a colored triangle.
To accomplish this, you'll need a Vertex Buffer, and you are going to specify Vertex Attributes for vertex position (x, y, z) and vertex color (r, g, b). Each vertex has 6 components. Begin by defining this Vertex Buffer data into a vector, like this:
private function initStage3D(e:Event):Void
{
    ...
    var vertices:Vector<Float> = Vector.ofValues(
        -0.3,-0.3, 0.0, 1.0, 0.0, 0.0, // x, y, z, r, g, b
        -0.3, 0.3, 0.0, 0.0, 1.0, 0.0,
         0.3, 0.3, 0.0, 0.0, 0.0, 1.0);
    ...
}
Then, create a VertexBuffer3D instance that you can use to upload the Vertex Buffer data to the GPU.
private var vertexBuffer:VertexBuffer3D;
...
private function initStage3D(e:Event):Void
{
    ...
    // Create VertexBuffer3D. 3 vertices, of 6 Floats each
    vertexBuffer:VertexBuffer3D = context3D.createVertexBuffer(3, 6);
    // Upload VertexBuffer3D to GPU. Offset 0, 3 vertices
    vertexBuffer.uploadFromVector(vertices, 0, 3);
    ...
}
You'll also need an Index Buffer to define your triangle. In this case, the lone triangle will simply consist of vertices 0, 1 and 2. Similar to the Vertex Buffer, the Index Buffer must also be uploaded to the GPU. To achieve this you'll use the IndexBuffer3D class:
private var indexBuffer:IndexBuffer3D;
...
private function initStage3D(e:Event):Void
{
    ...
    var indices:Vector<UInt> = Vector.ofValues(0, 1, 2);
    // Create IndexBuffer3D. Total of 3 indices. 1 triangle of 3 vertices
    indexBuffer = context3D.createIndexBuffer(3);
    // Upload IndexBuffer3D to GPU. Offset 0, count 3
    indexBuffer.uploadFromVector(indices, 0, 3);
    ...
}
The code above defines the geometry. Now you need both a Vertex and a Fragment Shader.
To keep it simple, you'll use the same shader program discussed in a previous article in this series titled What is AGAL?. The Vertex Shader simply transforms the vertices according to a transform matrix passed in from Haxe, and then passes along the vertex color down the rendering pipeline to the Fragment Shader.
m44 op, va0, vc0
mov v0, va1
The Fragment Shader gets the interpolated color from its input and passes it along as output color.
mov oc, v0
You'll use AGAL Mini Assembler to assemble the shader code into object code, and then use the Program3D API class to upload the shader to the GPU.
private function initStage3D(e:Event):Void
{
    ...
    var vertexShaderAssembler:AGALMiniAssembler = new AGALMiniAssembler();
    vertexShaderAssembler.assemble(Context3DProgramType.VERTEX,
        "m44 op, va0, vc0\n" + // pos to clipspace
        "mov v0, va1" // copy color
    );

    var fragmentShaderAssembler:AGALMiniAssembler = new AGALMiniAssembler();
    fragmentShaderAssembler.assemble(Context3DProgramType.FRAGMENT,

        "mov oc, v0 "
    );

    program = context3D.createProgram();
    program.upload(vertexShaderAssembler.agalcode, fragmentShaderAssembler.agalcode);
    ...
}
Rendering the scene
At this point, the scene is now ready for rendering. In this section, you'll set up a rendering loop. Just create an onRender function that is called at every frame by an ENTER_FRAME event.
private function onRender(e:Event):Void
{
    if (context3D == null)
        return;
    ...
}
At the start of each frame render, you'll call clear() on the Context3D instance. This clears the rendering color buffer (the surface on which the content is rendered) with a background color that we pass in (as the depth and stencil buffers associated with the Context3D get cleared). Use the code shown below to pass in a white background:
private function onRender(e:Event):Void
{
    ...
    context3D.clear(1, 1, 1, 1);
    ...
}
At each frame you'll have to enable the Program3D with the uploaded Shaders, as well as the VertexBuffer3D, associating the Vertex Attributes with the proper Shader Attribute Registers, as discussed in the previous article What is AGAL.
You'll also need to pass in the transform matrix, used by the Vertex Shader. Let's use a rotation matrix that varies at each frame, to let our triangle spin a little bit…
private function onRender(e:Event):Void
{
    ...
    // vertex position to attribute register 0
    context3D.setVertexBufferAt(0, vertexBuffer, 0, Context3DVertexBufferFormat.FLOAT_3);
    // color to attribute register 1
    context3D.setVertexBufferAt(1, vertexBuffer, 3, Context3DVertexBufferFormat.FLOAT_3);
    // assign shader program
    context3D.setProgram(program);

    var m:Matrix3D = new Matrix3D();
    m.appendRotation(Lib.getTimer() / 40.0, Vector3D.Z_AXIS);
    context3D.setProgramConstantsFromMatrix(Context3DProgramType.VERTEX, 0, m, true);
    ...
}
After setting this up, it's time to perform the actual rendering. You'll need to call the drawTriangles method on the Context3D instance, passing in the Index Buffer; this operation will render the triangle to the rendering surface (the color buffer).
Finally, after you are finished rendering all the 3D objects of the scene in that frame (in this example, there is only one), you'll need to call the present method on the Context3D instance. This method tells Stage3D that the app has rendered the frame and the frame is ready to be presented to the screen.
private function onRender(e:Event):Void
{
    ...
    context3D.drawTriangles(indexBuffer);

    context3D.present();
}
Run the Hello Triangle Colored application to see the finished result and take a moment to enjoy your creation (see Figure 2).
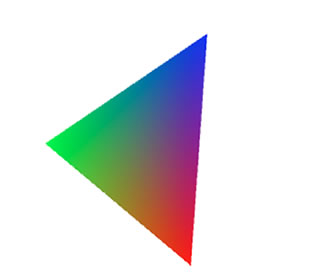
Figure 1. The completed Hello Triangle Colored application.
Here is the entire code sample used to create the Hello Triangle Colored application:
import openfl.Lib;
import openfl.Vector;
import openfl.display.Sprite;
import openfl.display3D.Context3D;
import openfl.display3D.Context3DProgramType;
import openfl.display3D.Context3DVertexBufferFormat;
import openfl.display3D.IndexBuffer3D;
import openfl.display3D.Program3D;
import openfl.display3D.VertexBuffer3D;
import openfl.events.Event;
import openfl.geom.Matrix3D;
import openfl.geom.Vector3D;
import openfl.utils.AGALMiniAssembler;

class HelloTriangleColored extends Sprite
{
    private var context3D:Context3D;
    private var program:Program3D;
    private var vertexBuffer:VertexBuffer3D;
    private var indexBuffer:IndexBuffer3D;

    public function new()
    {
        super();

        stage.stage3Ds[0].addEventListener(Event.CONTEXT3D_CREATE, initStage3D);
        stage.stage3Ds[0].requestContext3D();

        addEventListener(Event.ENTER_FRAME, onRender);

    }

    private function initStage3D(e:Event):Void
    {
        context3D = stage.stage3Ds[0].context3D;
        context3D.configureBackBuffer(800, 600, 1, true);

        var vertices:Vector<Float> = Vector.ofValues(
            -0.3,-0.3, 0.0, 1.0, 0.0, 0.0, // x, y, z, r, g, b
            -0.3, 0.3, 0.0, 0.0, 1.0, 0.0,
             0.3, 0.3, 0.0, 0.0, 0.0, 1.0);

        // Create VertexBuffer3D. 3 vertices, of 6 Floats each
        vertexBuffer = context3D.createVertexBuffer(3, 6);
        // Upload VertexBuffer3D to GPU. Offset 0, 3 vertices
        vertexBuffer.uploadFromVector(vertices, 0, 3);

        var indices:Vector<UInt> = Vector.ofValues(0, 1, 2);

        // Create IndexBuffer3D. Total of 3 indices. 1 triangle of 3 vertices
        indexBuffer = context3D.createIndexBuffer(3);
        // Upload IndexBuffer3D to GPU. Offset 0, count 3
        indexBuffer.uploadFromVector(indices, 0, 3);

        var vertexShaderAssembler:AGALMiniAssembler = new AGALMiniAssembler();
        vertexShaderAssembler.assemble(Context3DProgramType.VERTEX,
            "m44 op, va0, vc0\n" + // pos to clipspace
            "mov v0, va1" // copy color
        );

        var fragmentShaderAssembler:AGALMiniAssembler = new AGALMiniAssembler();
        fragmentShaderAssembler.assemble(Context3DProgramType.FRAGMENT,

            "mov oc, v0"
        );

        program = context3D.createProgram();
        program.upload(vertexShaderAssembler.agalcode, fragmentShaderAssembler.agalcode);
    }

    private function onRender(e:Event):Void
    {
        if (context3D == null)
            return;

        context3D.clear(1, 1, 1, 1);

        // vertex position to attribute register 0
        context3D.setVertexBufferAt(0, vertexBuffer, 0, Context3DVertexBufferFormat.FLOAT_3);
        // color to attribute register 1
        context3D.setVertexBufferAt(1, vertexBuffer, 3, Context3DVertexBufferFormat.FLOAT_3);
        // assign shader program
        context3D.setProgram(program);

        var m:Matrix3D = new Matrix3D();
        m.appendRotation(Lib.getTimer() / 40.0, Vector3D.Z_AXIS);
        context3D.setProgramConstantsFromMatrix(Context3DProgramType.VERTEX, 0, m, true);

        context3D.drawTriangles(indexBuffer);

        context3D.present();
    }
}
Applying texture mapping
The Hello Triangle Colored application that you built in the previous part of this article renders a colored triangle. The triangle's colors are specified as Vertex Attributes, which are part of the Vertex Buffer. The triangle is an example of colored geometry and the colors are specified per-vertex.
In this section you'll explore a different way to render a geometry, using a common technique called texture mapping. Texture mapping is the process of using an image (a texture) to apply it to the geometry. You can think of this texture image as though it is an illustrated piece of paper, sort of like a piece of wallpaper. Specify a triangle (or, more generally, a 3D object), and wrap this illustrated paper around the surface of the object.
Using this strategy, you can render a 3D object as if it really contains all those tiny details from the illustrated texture. In reality, the texture details are not actually part of the geometry. The visual complexity is simply illustrated details from the applied texture image.
When you apply texture mapping you'll specify the exact positions the texture elements need to be placed on top of the geometry. Basically, when you wrap the geometry around with the texture image, you need to create a precise mapping that defines exactly where each pixel of the texture image should fall on the 3D geometry.
Working with UV coordinates
The way to line up a texture on the 3D geometry involves specifying the mapping on a per-vertex basis: for each vertex you specify a pair of 2D coordinates, indicated as (U, V), that define the point of the texture image that corresponds to that specific vertex. So, these UV coordinates are specified as Vertex Attributes in the Vertex Buffer and the Vertex Shader receives them as an input stream.
Then, as it normally happens with Vertex Attributes, the Vertex Shader passes the UV coordinates out as outputs down the rendering pipeline, and the Rasterizer interpolates them (for more details, see a previous article in this series titled Vertex and Fragment Shaders). In this way, the Fragment Shader receives the proper values of the UV coordinates for each triangle Fragment (for each pixel that will be rendered). So, each pixel of each rendered triangle gets mapped to a specific pixel of the texture (also known as a texture element, or texel).
In other words, by specifying the UV coordinates, you've created a mapping between the 3D geometry and the texture image. The is the concept behind the term texture mapping.
Working with the Texture class in the Stage3D API
The Texture class in the Stage3D API includes support for applying textures.
A texture image must first be uploaded to the GPU memory in order to be used during rendering. You can use the Texture class to upload a texture image to the GPU, using the following code:
private var texture:Texture;
...

private function initStage3D(e:Event):Void
{
    ...
    var bitmapData:BitmapData = Assets.getBitmapData("assets/img/RockSmooth.jpg");
    texture = context3D.createTexture(bitmapData.width, bitmapData.height, Context3DTextureFormat.BGRA, false);
    texture.uploadFromBitmapData(bitmapData);
    ...
}
As discussed above, the Vertex Shader receives the UV texture coordinates as a Vertex Attribute, and passes them as output down the rendering pipeline so that they can be properly interpolated and fed to the Fragment Shader. The Vertex Shader is very similar to the the colored triangle sample project described above, except that Attribute Register 1 contains UV coordinates instead of color values.
m44 op, va0, vc0
mov v0, va1
The Fragment Shader receives the interpolated UV coordinates and uses them to sample the texture, through a Texture Sampler.
Let's imagine that the texture is associated to Haxe to Texture Sampler 0. In this case, the Fragment Shader will be:
tex ft1, v0, fs0 <2d>
mov oc, ft1
The first line of the Fragment Shader samples the texture using Texture Sampler 0 and the UV coordinates in varying register 0, and copies the result into Temporary Register 1. The second line simply copies the content of Temporary Register 1 (the sampled texture) to the output.
Modifying the Hello Triangle Colored application to apply a texture map
In this section you'll modify the previous Hello Triangle application, so that it uses texture mapping.
The first thing to update in the application is to add an image for a texture. In your OpenFL project.xml file, add an <assets/> element to load an external texture image:
...
    <assets path="assets/img/RockSmooth.jpg"/>
</project>
You'll also need to change the definition of the Vertex Buffer. Rather than passing the color Vertex Attribute, you'll provide UV coordinates:
private function initStage3D(e:Event):Void
{
    ...
    var vertices:Vector<Float> = Vector.ofValues(
        -0.3,-0.3,0.0, 1.0, 0.0, // x, y, z, u, v
        -0.3, 0.3, 0.0, 0.0, 1.0,
         0.3, 0.3, 0.0, 1.0, 1.0);

    // Create VertexBuffer3D. 3 vertices, of 5 Floats each
    vertexBuffer = context3D.createVertexBuffer(3, 5);
    // Upload VertexBuffer3D to GPU. Offset 0, 3 vertices
    vertexBuffer.uploadFromVector(vertices, 0, 3);
    ...
}
Notice that UV coordinates are defined between 0 and 1, where (U, V) = (0, 0) means the bottom-left corner of the texture image, and (U, V) = (1, 1) means the top-right corner.
The rendering loop then enables the Texture object, and associates it to Texture Sampler 0 that is used by the Fragment Shader:
private function onRender(e:Event):Void
{
    ...
    // assign texture to texture sampler 0
    context3D.setTextureAt(0, texture);
    ...
}
After making these changes, run the application again to see the textured triangle displayed in the Stage3D app you created (see Figure 3).
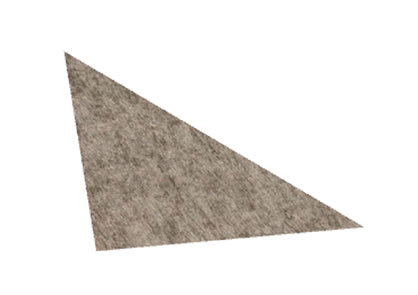
Figure 2. The completed Hello Triangle Textured application.
Here's the entire code sample used to create the Hello Textured Triangle application:
import openfl.Lib;
import openfl.Vector;
import openfl.display.BitmapData;
import openfl.display.Sprite;
import openfl.display3D.Context3D;
import openfl.display3D.Context3DProgramType;
import openfl.display3D.Context3DTextureFormat;
import openfl.display3D.Context3DVertexBufferFormat;
import openfl.display3D.IndexBuffer3D;
import openfl.display3D.Program3D;
import openfl.display3D.VertexBuffer3D;
import openfl.display3D.textures.Texture;
import openfl.events.Event;
import openfl.geom.Matrix3D;
import openfl.geom.Vector3D;
import openfl.utils.AGALMiniAssembler;
import openfl.utils.Assets;

class HelloTriangleTextured extends Sprite
{
    private var texture:Texture;

    private var context3D:Context3D;
    private var program:Program3D;
    private var vertexBuffer:VertexBuffer3D;
    private var indexBuffer:IndexBuffer3D;

    public function new()
    {
        super();

        stage.stage3Ds[0].addEventListener(Event.CONTEXT3D_CREATE, initStage3D);
        stage.stage3Ds[0].requestContext3D();

        addEventListener(Event.ENTER_FRAME, onRender);
    }

    private function initStage3D(e:Event):Void
    {
        context3D = stage.stage3Ds[0].context3D;
        context3D.configureBackBuffer(800, 600, 1, true);

        var vertices:Vector<Float> = Vector.ofValues(
            -0.3,-0.3, 0.0, 1.0, 0.0, // x, y, z, u, v
            -0.3, 0.3, 0.0, 0.0, 1.0,
             0.3, 0.3, 0.0, 1.0, 1.0);

        // Create VertexBuffer3D. 3 vertices, of 5 Numbers each
        vertexBuffer = context3D.createVertexBuffer(3, 5);
        // Upload VertexBuffer3D to GPU. Offset 0, 3 vertices
        vertexBuffer.uploadFromVector(vertices, 0, 3);

        var indices:Vector<UInt> = Vector.ofValues(0, 1, 2);

        // Create IndexBuffer3D. Total of 3 indices. 1 triangle of 3 vertices
        indexBuffer = context3D.createIndexBuffer(3);
        // Upload IndexBuffer3D to GPU. Offset 0, count 3
        indexBuffer.uploadFromVector(indices, 0, 3);

        var bitmapData:BitmapData = Assets.getBitmapData("assets/img/RockSmooth.jpg");
        texture = context3D.createTexture(bitmapData.width, bitmapData.height, Context3DTextureFormat.BGRA, false);
        texture.uploadFromBitmapData(bitmapData);

        var vertexShaderAssembler:AGALMiniAssembler = new AGALMiniAssembler();
        vertexShaderAssembler.assemble(Context3DProgramType.VERTEX,
            "m44 op, va0, vc0\n" + // pos to clipspace
            "mov v0, va1" // copy UV
        );

        var fragmentShaderAssembler:AGALMiniAssembler = new AGALMiniAssembler();
        fragmentShaderAssembler.assemble(Context3DProgramType.FRAGMENT,
            "tex ft1, v0, fs0 <2d>\n" +
            "mov oc, ft1"
        );

        program = context3D.createProgram();
        program.upload(vertexShaderAssembler.agalcode, fragmentShaderAssembler.agalcode);
    }

    private function onRender(e:Event):Void
    {
        if (context3D == null)
            return;

        context3D.clear(1, 1, 1, 1);

        // vertex position to attribute register 0
        context3D.setVertexBufferAt(0, vertexBuffer, 0, Context3DVertexBufferFormat.FLOAT_3);
        // UV to attribute register 1
        context3D.setVertexBufferAt(1, vertexBuffer, 3, Context3DVertexBufferFormat.FLOAT_2);
        // assign texture to texture sampler 0
        context3D.setTextureAt(0, texture);
        // assign shader program
        context3D.setProgram(program);

        var m:Matrix3D = new Matrix3D();
        m.appendRotation(Lib.getTimer() / 40.0, Vector3D.Z_AXIS);
        context3D.setProgramConstantsFromMatrix(Context3DProgramType.VERTEX, 0, m, true);

        context3D.drawTriangles(indexBuffer);

        context3D.present();
    }
}
Where to go from here
In this article you used the concepts learned in the previous articles in the Stage3D series, to finally drill into the core processes and create two fully working OpenFL applications based on Stage3D. Even though the sample applications just created a simple scene, consisting of a single triangle, all of the concepts of working with Stage3D are included. From here on as you experiment with building Stage3D apps, things will only get deeper and more interesting.
In the next article in the Stage3D series, you'll learn about a fundamental topic for 3D rendering: working with perspective.